Posts tagged facebook
The Birthday Club and Facebook’s API
0I recently finished working on KMart’s Birthday Club website, a wordpress-based children’s site that is geared towards parents looking to make their child’s special day memorable. My role was handling all the social media aspects required in the project plan.
One of the bigger problems I ran into with this – I really didn’t like any of the existing facebook plugins for WordPress, so I ended up building my own. It was really an interesting learning experience. This gave me the opportunity to dig deeper into the new facebook Graph API than I have in the past, and it wasn’t as terrible as the facebook API once was.
My largest, and most interesting task, was to pull down photo-galleries and create a taxonomy for each one. The interaction with facebook for pretty much everything I had to do was fairly simple:
/** * Fetches data from facebook API * * @author Jason Corradino * * @param $path (required) facebook query path * @param $format (optional) format data is returned as either an object or json [obj|json] * @param $attr (optional) Adds additional attributes to the URL * * @return returns object of facebook data by default, json if 'format' parameter is set to json * */ static function getData($path, $format="obj", $attr="") { $pluginOptions = get_option('facebook_gallery_options'); $token = $pluginOptions["token"] ? $pluginOptions["token"] : FACEBOOK_APP_TOKEN; $ch = curl_init(); curl_setopt($ch, CURLOPT_URL, "https://graph.facebook.com/".$path."?access_token=".$token."&api_key=".FACEBOOK_API_KEY."&".$attr); curl_setopt($ch, CURLOPT_RETURNTRANSFER, 1); $return = curl_exec($ch); curl_close($ch); return ($format == "json") ? $return : json_decode($return); } |
The above code will use your facebook application token to open up a curl with the facebook graph API, pulling down the requested data set within the URL, returning in the format set within the function call — defaulting to an object, but allowing a JSON response.
There will be a more detailed post about this down the line, and I am considering releasing the plugin I built to wordpress.org extend. So look forward to that.
Happy coding
How to remove spammy facebook apps. (updated)
1When facebook released their new timeline layout, the path you must take to remove junk applications from your facebook profile has also changed, so I thought I would post the new steps to help out anyone in need. It is still fairly easy to do, so lets get to it.
Step 1
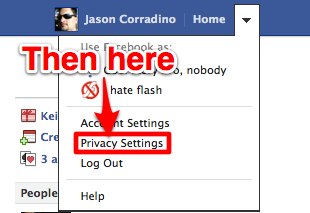
And select privacy settings
Step 2
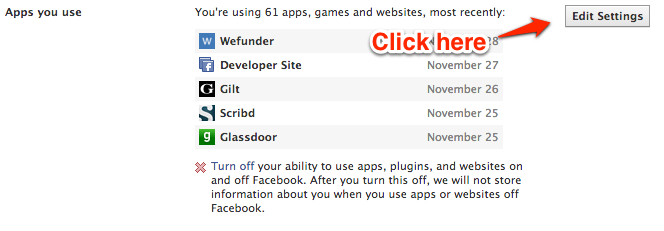
Scroll down to Apps and Websites and click Edit Settings
Step 3
Select “Remove unwanted or spammy apps”
Step 4
Now we just need to select the application
and then remove it
And that’s it, now just repeat step 4 until you’ve removed all of the apps you don’t want.
How to remove spammy facebook apps.
0NOTE!
I have updated this blog post for the new Timeline layout, you can find new post here.
I see enough of these to make this a dedicated post. This is going to be another rather simple post, just basic descriptions and pictures.
Step 1
Click “apps” on the left rail of your profile to pull up your most used apps.
Step 2
Your next step is to click “more” to open up a more detailed list of apps.
Step 3
Your “more detailed list of apps” only really shows the ones you used most recently. From here, you want to click “Remove unwanted or spammy apps,” as this will bring up a full list of everything set up on your profile
Step 4
Lets say you don’t want Graffiti, which I didn’t, all you have to do is click any of the text to bring up the application panel.
Step 5
Here you can see exactly what this app has access to, to remove it, you simply have to click “Remove App,” you will get a confirmation box, but you are essentially done. Rinse and repeat step 4 and 5 until you have removed everything you don’t like.
Facebook chat not working on adium?
0It wasn’t for me, so I searched finally came up with a solution. Since the solution is rather techie, I figured I would throw it up on here sans-technobabble.
Step 1
The first step is to figure out your username, the easiest way to do this is to see what is set after the slash on your profile page. Remember this, you will use it later on. Note that this could also be a number, you will use the number later on in place of a name.
Step 2
The next step, we start to create the account. Go to your Adium account window by selecting Adium from the menu bar and selecting preferences. Go to add a new account – like you would for any other account – and select Jabber.


